
How to configure Context Menus
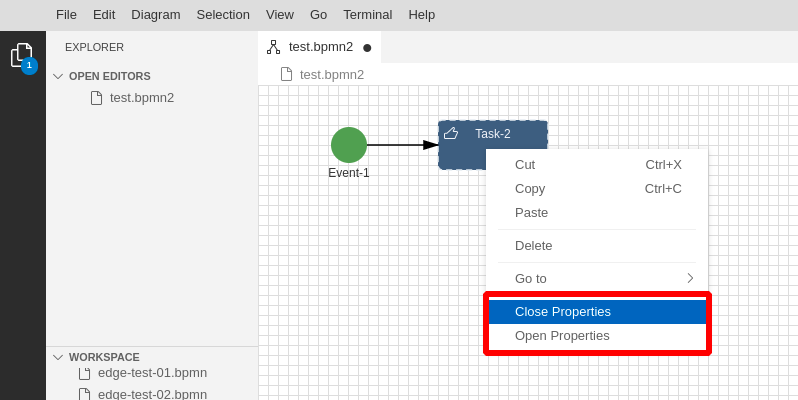
Context menus in GLSP are menu actions triggered in the conext of a selected element or a the diagram plane. Conext menues are tightly coupled to the execution platform. For example in Theia the context menu is shown by a right-mouse-click on the diagram plane.
In Visual-Code the same menu action is handled as a so called sub-menu which appears on the top bar of the diagram.

For this reason the implementation is different for both platforms. To add custom menu elements in the diagram context menu the following parts need to be implemented
Define Your Own Action
Before you get started, you'll need to define your custom Action class (unless you're using one of the GLSP default actions).
export interface MyAction extends Action {
  kind: typeof MyAction.KIND;
}

export namespace MyAction {
  export const KIND = 'properties';

  export function is(object: any): object is MyAction {
      return Action.hasKind(object, KIND);
  }

  export function create(): MyAction {
      return { kind: KIND };
  }
}
Correspondign to your action you also define a ActionHandler class
@injectable()
export class MyActionHandler implements IActionHandler {
  handle(action: MyAction): void | MyAction {
    console.log('--------> custom action arrived');
    // implement your custom logic to handle the action
    // Optionally issue a response action
  }
}
… and register the handler in your DiagramModule:
const bpmnDiagramModule = new ContainerModule((bind, unbind, isBound, rebind) => {
    const context = { bind, unbind, isBound, rebind };
    ....
    // Action BPMN Property Action Handler
    configureActionHandler(context, MyAction.KIND, MyActionHandler);
    ...

});
Next you can define a new Context Menu with you own Custom Action class.
Context Menu in Theia Module
To add a new context menu entry in the Theia platform you first need to implement a command and menu contribution class within your Theia-client-part. This can be done in a separate module. This module is exporting two classes:
- a
CommandContributiondefining a command action to be send - a
MenuContributiondefining the context menu entries
In the CommandContribution it is also possible to define in which situation the context mene should be enabled or disabled. For example you can verify if an element is selected or not. The MenuContribution defines the name and path of the menu entry.
export namespace MyCustomCommands {
    export const OPEN_ACTION = 'glsp-my-open-action';
}

@injectable()
export class MyCommandContribution implements CommandContribution {
    @inject(ApplicationShell) protected readonly shell: ApplicationShell;
    registerCommands(commands: CommandRegistry): void {
        // register commands...
        commands.registerCommand(
            { id: MyCustomCommands.OPEN_ACTION, label: 'Open Properties' },
            new GLSPCommandHandler(this.shell, {
                actions: () => [MyAction.create()],
                isEnabled: context => context.selectedElements.length === 1
            })
        );
    }
}

@injectable()
export class MyMenuContribution implements MenuContribution {
    registerMenus(menus: MenuModelRegistry): void {
        menus.registerMenuAction(GLSPContextMenu.MENU_PATH.concat('z'), {
            commandId: MyCustomCommands.OPEN_ACTION,
            label: 'Open Properties'
        });
    }
}
Next the contributions need to be bound in TheiaFrontendModule of the webview. This can be done by overwriting the configure(context) method. Here is an example:
...
    override configure(context: ContainerContext): void {
      context.bind(CommandContribution).to(MyCommandContribution);
      context.bind(MenuContribution).to(MyMenuContribution);
  }
...
Now whenever the user opens the context menu in the diagram plane the new entry will appear and fires the corresponding command.
Context Menu in Visual Code
In Visual Code no context menu exits but the so called sub menu which appears on top of the diagram plane.
To add a new command contribution to a VisualCode extension the commands can be registered within the activate function of the extension module:
....
  configureDefaultCommands({
    extensionContext: context,
    connector: glspVscodeConnector,
    diagramPrefix: "bpmn",
  });

  context.subscriptions.push(
    vscode.commands.registerCommand("bpmn.showProperties", () => {
      console.log("send show properties...");
      glspVscodeConnector.sendActionToActiveClient(
        MyAction.create("properties")
      );
    })
  );
...
Also here the command is responsible for sending the corresponding action event.
Next you can register the sub menu entries in the extension configuration in the file package.json within the contributes section:
....
  "contributes": {
    ....
    "commands": [
      {
        "command": "bpmn.showProperties",
        "title": "Show Properties...",
        "category": "BPMN Diagram",
        "enablement": "activeCustomEditorId == 'bpmn-diagram' && bpmn.editorSelectedElementsAmount == 1"
      },
      {
        "command": "bpmn.closeProperties",
        "title": "Close Properties...",
        "category": "BPMN Diagram",
        "enablement": "activeCustomEditorId == 'bpmn-diagram' && bpmn.editorSelectedElementsAmount == 1"
      }
    ],
    "submenus": [
      {
        "id": "bpmn.editor.title",
        "label": "Diagram"
      }
    ],
    "menus": {
      "editor/title": [
        {
          "submenu": "bpmn.editor.title",
          "group": "bookmarks"
        },
        {
          "command": "bpmn.showProperties",
          "group": "navigation",
          "when": "activeCustomEditorId == 'bpmn-diagram' && bpmn.editorSelectedElementsAmount == 1"
        },
        {
          "command": "bpmn.closeProperties",
          "group": "navigation",
          "when": "activeCustomEditorId == 'bpmn-diagram' && bpmn.editorSelectedElementsAmount == 1"
        }
      ],
....
Note: To integrate GLSP Actions into the VSCode you need to define the Action class again in your extension module. We do this in the file open-bpmn-actions.ts. For some reason it is not possible to import this class from a other package.
The NaviateAction
The context menu command is a generic API for handling all context menu actions. One special action type, provided by the GLSP API is the NaviateAction which is tailored for specific use cases.
The NaviateAction can be used to implement complex navigation like Go to next Node, Go to reference, Go to source etc. where the client does not have all the necessary information to navigate to the correct target. In this cases your menu command can trigger a NavigateAction with a specific navigation target. The action is send to the server which is responsible for resolving the target and sends back the necessary information so that the client can actually navigate to this target. You can find a good example in the GLSP Workflow Example.
To register this kind of action on the client use the class NavigateAction which specifies the target.
...
import { NavigateAction } from '@eclipse-glsp/client';
...
        commands.registerCommand(
            { id: PropertyPanelCommands.PROPERTIES_OPEN, label: 'Open Documentation' },
            new GLSPCommandHandler(this.shell, {
                actions: () => [NavigateAction.create('documentation')],
                isEnabled: context => context.selectedElements.length === 1
            })
        );
On the server this action will result in a RequestNavigationTargetsAction (see NavigationActionHandler) in order to request the navigation targets from the server.
public class PropertiesNavigationTargetProvider implements NavigationTargetProvider {

   @Override
   public String getTargetTypeId() {
      return "documentation";
   }
   @Override
   public List<? extends NavigationTarget> getTargets(final EditorContext editorContext) {
      // your code goes here...
      return Arrays.asList();
   }
}
Adn in your DiagramModule you need again bind your Provider class
....
    @Override
    protected void configureNavigationTargetProviders(final MultiBinding<NavigationTargetProvider> binding) {
        super.configureNavigationTargetProviders(binding);
        binding.add(PropertiesNavigationTargetProvider.class);
    }
    ...